
Easter Marshmallow Eggs

There’s something incredibly delightful about Easter, especially when it arrives with an explosion of colors, flavors, and the promise of sweet treats. One of the highlights of this festive season is undoubtedly Easter Marshmallow Eggs. These treats are a sensory experience—the softness of marshmallow combined with a rich chocolate coating creates a blissful contrast that is hard to resist. As you pop one into your mouth, the sweetness dances on your tongue, evoking memories of childhood Easters spent hunting for brightly colored eggs.

Making these homemade candies is not only a fun project but also a fantastic way to engage with family, especially with kids eager to get involved. This no-bake Easter dessert is a simple, budget-friendly approach to holiday sweets, and you don’t need a culinary degree to make them shine. Best of all, you can swap out colors or shapes to suit your celebrations. So roll up your sleeves and let’s dive into this delicious adventure!
Table of Contents
Why You’ll Love This Recipe
- Simple & Quick: You can whip up these Easter treats in just about 25 minutes of prep time, and they set in no time!
- Irresistible Flavor: The fluffy marshmallow filling paired with chocolate creates a perfect balance of sweetness.
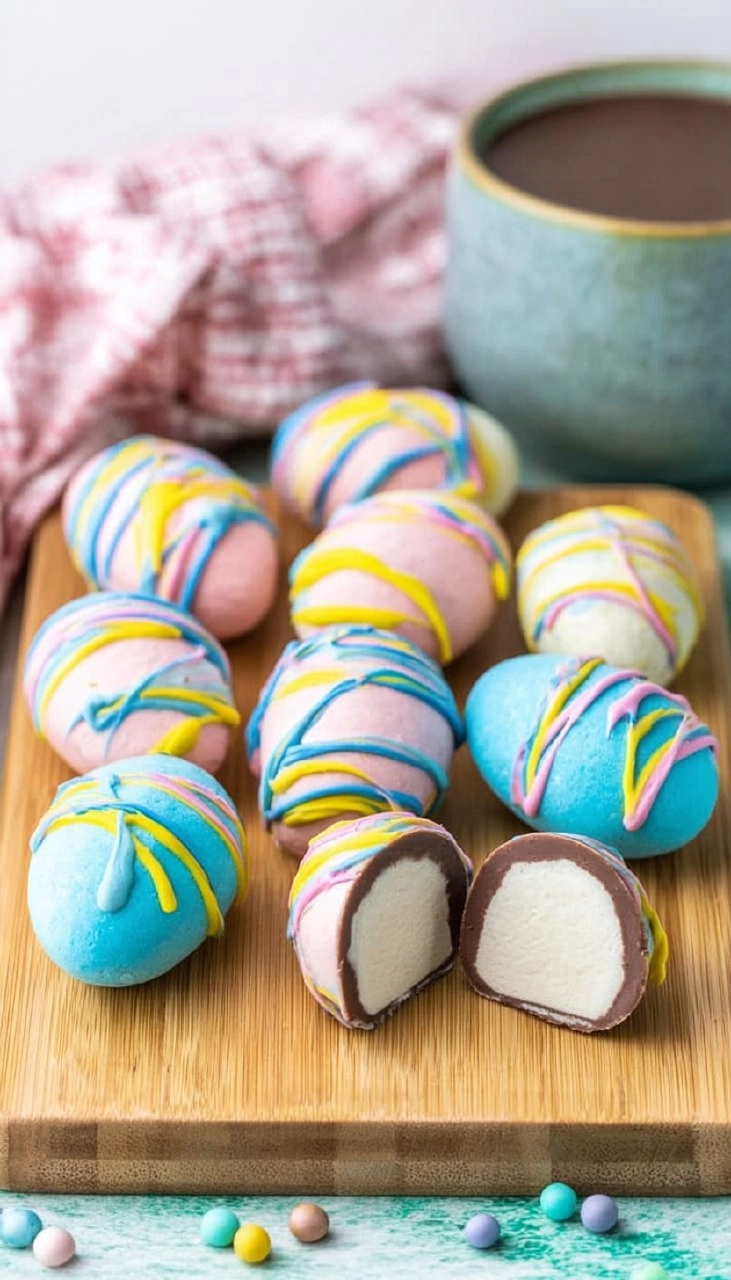
- Eye-Catching Appeal: Brightly colored candy melts and cute shapes make these eggs visually stunning—ideal for festive displays.
- Flexible Serving: Great for parties, dessert tables, or as delightful gifts. Everyone will want a piece!
- Diet-Friendly Options: Easily adaptable to be gluten-free or dairy-free with simple ingredient swaps.
Ingredients You’ll Need
- 1 (7 ounce) jar marshmallow fluff: This is the heart of the recipe, providing the luscious, chewy interior. If needed, you can use homemade marshmallow if you have a recipe.
- 6 tablespoons salted butter, softened: The butter adds richness and helps bind the ingredients. Use unsalted butter for a less salty flavor.
- 1/4 teaspoon vanilla extract: This enhances the overall flavor of the filling. Use pure vanilla extract for the best flavor.
- 3 cups powdered sugar: This sweetens and thickens the marshmallow mixture, giving it that classic candy texture. You can substitute with confectioner’s sugar if you’re out.
- 1 cup each colored candy melts (yellow, pink, blue): They add vibrant colors to the molds; feel free to get creative with your favorite shades.
- 1 pound chocolate almond bark, divided: This creates a smooth, chocolatey coating. You can substitute with regular chocolate chips if you prefer.
- 16 count silicone egg molds: Using silicone makes it easy to pop out the eggs without breaking them. You can use plastic molds if silicone isn’t available.
How to Make Easter Marshmallow Eggs
Make the Marshmallow Mixture: In a mixing bowl, combine 1 (7 ounce) jar marshmallow fluff, 6 tablespoons softened salted butter, 3 cups powdered sugar, and 1/4 teaspoon vanilla extract. Use a stand or hand mixer to blend everything until well combined and creamy.
Melt the Candy Melts: In three separate microwave-safe bowls, place the colored candy melts—one for each color. Heat them in 30-second intervals, stirring in between, until they are completely melted and smooth.
Drizzle into Molds: Using a spoon or piping bag, drizzle the melted colored candy into the egg molds, creating fun patterns as you go.
Prepare the Chocolate Coating: In another microwave-safe bowl, melt half of the chocolate almond bark until smooth, heating in 30-second intervals.
Chocolate the Molds: Line cupcake tins with paper or foil liners. Spoon the melted chocolate into the silicone molds, ensuring it coats the edges well. Turn the molds upside down on a cooling rack so the excess chocolate can drip out and set.
Fill with Marshmallow: Once the chocolate edges are set, divide the marshmallow mixture evenly among the egg molds, filling them to the top.
Complete with Chocolate: Melt the remaining chocolate almond bark and pour it over the marshmallow in the molds until they’re filled.
Chill to Set: Allow the filled molds to sit at room temperature until set, or place them in the refrigerator for about 10 minutes to speed up the process.
Unmold and Serve: Carefully remove the Easter Marshmallow Eggs from the molds. They should pop out easily if you’ve coated them well with chocolate.
Enjoy: Share these delightful treats with family and friends, and watch them disappear in no time!
Storing & Reheating
These Easter Marshmallow Eggs can be stored at room temperature in an airtight container for up to one week. If you’d like to keep them longer, refrigerate them, which will extend their shelf life by another week. For long-term storage, you can freeze the eggs for up to three months. Thaw them in the refrigerator before serving. The texture may change slightly after freezing, but they will remain delicious!
Chef’s Helpful Tips
- Ensure your butter is at room temperature for easier mixing; cold butter can lead to lumps in your mixture.
- Be careful when melting your chocolate; stir frequently to avoid burning. Chocolate should be smooth and glossy.
- To create fun designs, experiment with how you drizzle your colored candy melts into the molds.
- If the filled molds aren’t setting properly, returning them to the fridge for a few minutes can help firm them up.
- Consider using flavoring extracts, like almond or coconut, to enhance the marshmallow filling.
Easter is a season of joy, renewal, and, of course, delicious treats! Embrace the spirit of the holiday by gathering loved ones around for a fun candy-making session. You’ll find that creating Easter Marshmallow Eggs not only brings joy but also opens the door to lasting memories. The vibrant colors and sweet flavors will surely brighten up your celebration.
Recipe FAQs
How long do these marshmallow eggs last?
Can I use different colors for the candy melts?
Can I make these eggs vegan?
Why is my chocolate not coating properly?
More Desserts & Appetizers Recipes
👉 If you make my Easter Marshmallow Eggs recipe, please leave a comment and a star rating — it really helps others discover the recipe.
Follow me on
Pinterest
for more easy recipes.

Easter Marshmallow Eggs
- Prep Time: 25 minutes
- Cook Time: 145 minutes
- Total Time: 2 hours 50 minutes
- Yield: 16 servings 1x
- Category: Desserts & Appetizers
- Method: Baking
- Cuisine: American
Description
Easter Marshmallow Eggs are a fun and delicious treat, perfect for sharing during the holiday season. With irresistible flavors from marshmallow fluff and colorful candy melts, this simple recipe is sure to impress. Loaded with chocolate and creativity, it’s an easy homemade dessert that will make your celebrations sweeter!
Ingredients
- 1 (7 ounce) jar marshmallow fluff
- 6 tablespoons salted butter, softened
- 1/4 teaspoon vanilla
- 3 cups powdered sugar
- 1 cup each colored candy melts, yellow, pink, blue
- 1 pound chocolate almond bark, divided
- 16 count silicone egg molds
Instructions
- In a mixing bowl, combine the marshmallow fluff, softened butter, powdered sugar, and vanilla extract using a mixer until well mixed.
- In three separate microwave-safe bowls, melt the colored candy melts in 30-second intervals until smooth.
- Drizzle each color into the silicone molds.
- In another microwave-safe bowl, melt the chocolate almond bark until smooth.
- Line cupcake tins with paper or foil liners.
- Melt half of the chocolate almond bark in 30-second intervals until smooth.
- Spoon the melted chocolate into the silicone mold and spread it around the edges.
- Set the molds upside down on a cooling rack to allow excess chocolate to drip out and set.
- Divide the marshmallow mixture evenly between the egg molds.
- Melt the remaining chocolate almond bark and fill up the rest of the molds.
- Set aside to cool or place in the refrigerator for 10 minutes until set.
- Carefully remove the eggs from the mold.
- Serve and enjoy!
Notes
Feel free to use different colors of candy melts to personalize your eggs.
Make sure the chocolate is cooled before adding the marshmallow mixture to prevent melting.
Store any leftovers in an airtight container at room temperature.
Nutrition
- Serving Size: 1 egg
- Calories: 210
- Sugar: 25g
- Sodium: 50mg
- Fat: 9g
- Saturated Fat: 5g
- Unsaturated Fat: 2g
- Trans Fat: 0g
- Carbohydrates: 29g
- Fiber: 0g
- Protein: 1g
- Cholesterol: 15mg